hfraelick

Archive for 2012|Yearly archive page

Wingy Dingys

In Paleo, Recipes on May 31, 2012 at 8:40 AM

The perfect at-home chicken wing. Yup, perfect. Unless, of course, you like your chicken wings soft and rubbery. If so, read no further.

Tomorrow is June 1st and I’m beyond overdue for a post so what could be a better way to kick off summer than with some good chicken wings? Grilling might be more seasonally appropriate but I have found that only really good way to get wings as crispy as I like is to broil them.

“Use Every Part of the Chicken” poster can be found on Etsy.

Ingredients

  • Chicken wings (Yup, that’s it! Sauce come later.)

You want to start with good wings. I pick up mine (plain!) at Tendercrop and I highly recommend them. Whatever you do don’t buy a bag of something that looks like Pterodactyl wings  – chicken wings should not be the size of your fist!

Next lay your wings out on a baking sheets (sometimes I’ll put them on a cooling rack on the baking sheet) with the thickest side facing down. Broil for 12 minutes. Then flip and broil for another 24. It sounds long but it’s not. The hubby likes his slightly less cooked and usually grabs his a few minutes before mine are done.

That’s it!

You could certainly add salt and pepper.

Sometimes I add the simplest sauce ever – melt butter, add some soy and some of your favorite hot sauce. You can either brush this on the wings (both sides) at about minute 20 or toss them immediately when they’re done.

It’s really that simple.

*Note: if your broiler is separate from our oven, in the bottom drawer, cooking times may vary slightly.

Nesting Eggs

In Paleo, Recipes on January 25, 2012 at 7:30 AM

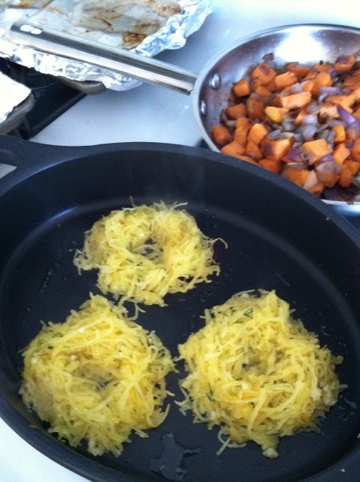
I saw this recipe from one of my newer blog crushes, The Urban Poser, for Rosemary Spaghetti Squash Egg Nests and I immediately bookmarked it on my computer and in my brain. I have to admit that I had never even tried spaghetti squash until I stopped eating pasta but now it’s one of my favorite things. Plus, anything with eggs is a score for me. Do you like spaghetti squash? If you do, you’ll love this recipe.

The nice part about this fancy breakfast we shared with my parents recently was that most of it can be prepped or partially cooked the day before with no impact on flavor. Here’s what we had and how I cooked it –

  • Sweet potato and red onion hash – baked the sweet potatoes the day before while I cooked the spaghetti squash, sauteed the onions in lard in the morning and threw in the sweet potatoes (diced) and let the flavors cook together for a while.
  • Tendercrop Farms bacon – baked on a cookie sheet while I prepped the egg nests morning-of
  • Spaghetti squash – cooked and pulled into strands the day before, refridgerated overnight and prepared according to the recipe the morning-of
  • Espresso with maple syrup
  • Champagne with blood orange wedges

Now onto the Urban Poser’s recipe, with a few notes from me in italics

Ingredients:
  • 3 cups cooked spaghetti squash (about 1 1/2 pounds)
  • 2-3 medium sized garlic cloves, finely minced
  • 2 medium sized shallots finely minced (I didn’t have any so I omitted it)
  • 2 Tbls olive oil (or hot bacon fat from the bacon I was cooking :)
  • 1 large egg
  • 1 Tlbs fresh rosemary finely chopped
  • 1 tsp or more salt
  • 5 Tbls finely ground almond four (more or less, depending on the wateriness of the squash) (forgot about this part and did not include haha)
  • cracked pepper to taste
Directions:
Cooking the squash:
Preheat the oven to 350 degrees. Cut the squash in half and clean out the seeds. Place the halves, cut side down in a large baking dish with about 1/4 inch of water at the bottom of of the dish. How long to cook the squash will depend on it’s size and season. Watch it closely while cooking, or it could become too watery. Put the squash in the oven for about 15 min. After 15 min take it out and check the spaghetti like fibers. After the first initial 15 min, continue cooking it in 10 min increments or less, checking often. You know it’s ready when the strands just begin to pull apart. The squash should be very ‘al dente’, but cooked enough to be able to separate the strands.
Remove from the oven and cool slightly. Using a fork, pull out the spaghetti like strands. Set aside in a bowl. Can be kept in an air tight container, in the fridge for up to 3 days.

20120124-215113.jpg

Making the nests:
Set the oven to broil.
In a cast iron (or oven safe) skillet…over medium heat, cook the garlic and shallots in the oil. These should fry slowly till they are lightly browned. Careful not to burn them. Scoop them out of the pan and set aside to drain on a paper towel. Wipe out the skillet with another paper towel.
In a large bowl combine the squash, garlic, shallots, egg, rosemary, salt and almond flour. Mix well. *I guess I wasn’t paying attention and I didn’t include the egg or the almond meal. They came out amazing but I will certainly try them with all the recommended ingredients next time
Heat the skillet over medium to medium high heat. Add a little oil (or choice of fat) for frying. Place a half cup mound of the spaghetti squash mixture into the skillet. Working quickly, use a spoon to press and push the center of the mound, making about a 1 inch round opening. It should be slightly larger than an egg yolk.

20120124-215137.jpg

Crack the egg into the opening. Immediately widen the circle as needed to get the egg to nestle down into the squash. If the nest seems too loose, use a spatula to draw the sides in a bit. Sometimes a little egg white over flows. This is fine. I just pull the white off from the outside of the nest as it cooks. Assemble one nest at a time(including adding the egg), fitting about 4 nests into an average sized cast iron pan. Continue to cook the nests until the bottom becomes crisp (but not burned). The yolks should still be mostly uncooked.
Transfer the skillet to the top rack under the broiler. Broil for for 2 1/2 to 3 min, depending on how you like your yolks. Keep a close eye on it. keep in mind that the yolk will continue to cook slightly after it is removed from the oven.
Remove from the oven, sprinkle with a little coarse sea salt and cracked pepper. Transfer to a plate and serve. I find that a very thin metal spatula works best for transferring these.
Alternatively you could cook the nests in a pan then transfer to a cookie sheet. Then cook the remaining nests, transfer those to the cookie sheet and broil all of them a the same time. This would work great if you were making a double recipe for a crowd.
*This is how I cooked mine and made 8 to broil at once so we could sit to eat together. Worked GREAT!

Coconut Curry Meatballs

In Paleo, Recipes on January 17, 2012 at 7:35 AM

I love coconut and I love curry. Bingo. Here’s a quick (potentially one dish) recipe that you can whip together depending on what you have on hand in the house. I never measure anything for this but I have estimated amounts below as a guide. If you don’t have an ingredient just leave it out. This is great eaten as is in a bowl or served over raw baby spinach, which will wilt nicely under the hot broth. Don’t forget to drink the broth – my Mom’s favorite part!

Curry Meatballs

  • 1 lb grass-fed beef (I’ve also used bison and ground lamb)
  • 1 egg
  • 1/2 cup almond meal (Trader Joe’s almond meal or just throw a few almond in your food processor until they’re a fine meal but not butter!)
  • Quarter of a yellow onion, few cloves of garlic garlic, fresh ginger – all minced
  • Few shakes of curry powder, turmeric, cinnamon
Gently mix all ingredients making sure to keep meatballs most (don’t add too much almond meal) and form small meatballs (makes about 12) Either pan sear lightly with coconut oil or cook in the oven 10-12 minutes on a lined or greased cookie sheet. The goal is only to partially cook them.
Curry Sauce
  • Remainder of onion (sliced)
  • 1 jalapeno, diced
  • Chopped fresh ginger
  • 1 cup unsweetened large coconut flakes (Tropical Traditions has great products)
  • Few shakes of curry powder, turmeric
  • 2 cans coconut milk (Whole Foods brand organic variety is my absolute favorite kind )

While meatballs are cooking saute the following in coconut oil: onions, jalapeno and ginger. When onions are soft, add unsweetened coconut flakes and let brown lightly. At this point you can add curry powder and turmeric and stir until spices become fragrant – about 30 seconds. Then add 2 cans of coconut milk and let the mixture come to a simmer. *At this point, if you want you can add any extra heat you like – I often add hot red curry paste.

Once the mixture is ready, add the meatballs and any juices from the pan and let the meatballs cook in the sauce until done – I like mine cooked medium. If you want, during the last few minutes of cooking add raw green beans (cut in half) and they will cook lightly.

For all those who can’t make money a priority…

In About Us on January 5, 2012 at 9:14 PM

…don’t stop.

Thanks for sharing this video, Tom. Folks, this’ll feed you.

Did anyone see December?

In About Us on January 2, 2012 at 7:32 AM

It seems to have passed without a post here at What Feeds Us. Whoops. Sorry ’bout that. I won’t bore you with that whole I was busy thing – you probably were too. What I’ll say, though, is that December was FULL. Full of holiday cheer, full of family and friend time, and full of good food.

Actually, the whole year was. While it was tough at times it was also full of bravery. So, we started 2012 true to that fashion and took an icy dip in the drink. Jumping in full speed – Bring it 2012!

It’s now that time – January 1st – when most people make some resolutions (often without success) that revolve around eating, exercise and overall quality of life. If you’re going that route or thinking about it might I recommend something a bit different – if you want to make changes, try setting goals. Write them down. Do a quick search and you’ll find tons of worksheets online to use as a template. Make them big and lofty but let’s be real – you never achieve that big, huge goal without doing THE WORK to get there. You have to do the work. Here are some tips on getting started –

Break your big goal down into multiple smaller goals. For example: if your goal is to blog more regularly (wink, wink), set a goal that you can achieve in a shorter amount of time that will help you get there, such as “I will spend one hour every week planning my blog writing schedule and listing ideas/topics to write about.”

Make it measurable. Can you measure your goal? If you can’t measure it, it’s not a goal.

Be as specific as possible. Affix dates and deadlines – you want to reach these goals, right?

Now, share them. Preferably with someone who will help you reach them.

Last January my husband and I did a New Years Paleo challenge for 8 weeks. 52 weeks later we’re still on it. We feel good, we look good (ya, it’s OK to say that! it’s even better to think it!) and we’re eating as well as we ever did before those changes. If your resolutions or goals are food related try not to spend every second of the day thinking about what you can’t or shouldn’t eat. Instead, make a list (even a mental one) of the foods you love that you can eat. Eat them! Feel good about it! Find new recipes to try and find some folks to help you stay focused.

A few of my goals for the new year include:

Blog more! How? By posting twice a week on here

Drink more water! How? Every time I think about coffee drink 8oz. Seriously, I think about coffee ALL DAY.

Keep getting closer to my food sources and be BRAVE about it. How? Visit the farms I buy my food from. Think about participating in the slaughter of, or catching of, said food. The hubs hunted a duck over the holiday – sounded great to my Paleo cavewoman mind but then it was there needing to be gutted, feathered, cooked – not gonna lie, I’m glad I didn’t have to handle anything other than photographing the process and eating the finished goods. I was a little squeamish at first but if this is the stuff I think is important, well, I better buck up and walk the walk.

Master that fucking pull-up. Pardon my french but my November 2010 goal was to do 10 pull-ups. Clearly, I’m not working hard enough at them. I am working at them. Sometimes it’s hard but it’s not cutting it. So, how will I do this? Spend 5 minutes on the bar working on them EVERY time I walk into CrossFit. I have not been consistent with this. Work at BOTH my strict dead hang pull-up and my kips.

What are some of your goals for 2012?